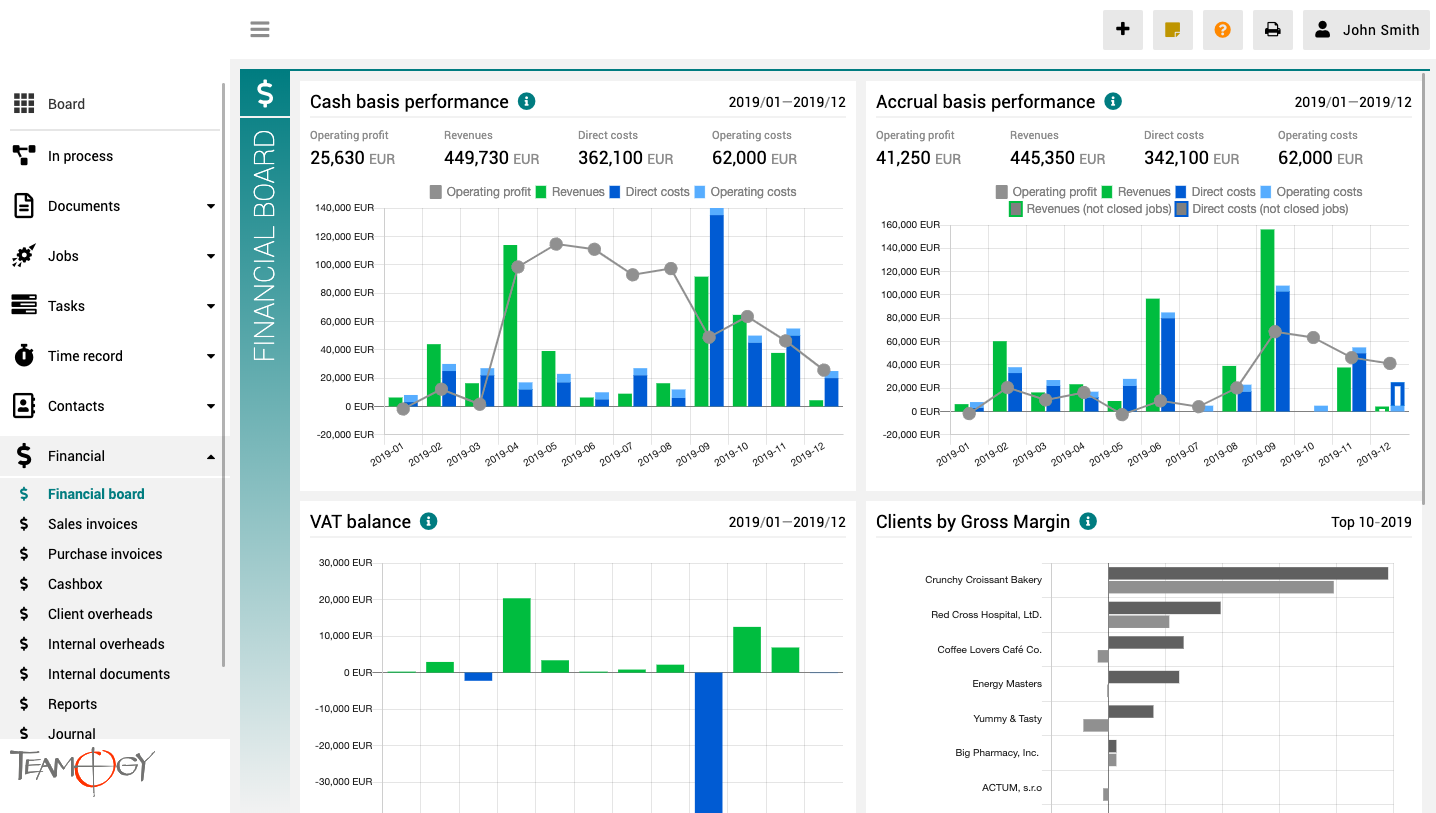
O Pulpicie finansowym
Pulpit finansowy to miejsce, które zapewnia wyraźny obraz całej agencji. Zawiera wykresy z kluczowymi wskaźnikami – ogólną ewolucję przychodów i kosztów agencji, zgodnie z aspektami finansowymi i jobu, różne poglądy na rentowność i wydajność klienta oraz raport VAT.
Wszystkie wykresy mają opcję wyboru zakresu dat, a dodatkowo raporty klientów mają również opcję monitorowania klientów najlepiej i najgorzej ocenianych.
Import users
Import UsersWe need tools to do the agenda more faster. Import is one of these tools. Clients often have many users which they want to enter into the Teamogy. You can import it as one big part. You just need to follow these steps to do it successfully: 1. Prepare the...
Import
Import Jobs & OverheadsWe need tools to do the agenda more faster. Import is one of these tools. Clients often have many overheads & jobs, which they want to enter into the Teamogy. You can import it as one big part. You just need to follow these steps to do...
Change Logo
Change Logo - Print & Screen DARK/LIGHT We know for partners it is very difficult to fullfill wishes and needs of Clients. One of the needs is to setup a Logo. Teamogy distinguish between logo inside the system and the logo on the print version of the documents. ...
New Job Category
New Job Category We know for partners it is very difficult to fullfill wishes and needs of Clients. One of the needs is to add the Job Category. 1. Unroll Configuration. 2. Click on Register. 3. Search by Main Key - Type there CATEGORY.JOB. 4. Open the register...
New Currency
New Currency We know for partners it is very difficult to fullfill wishes and needs of Clients. One of the needs is to add the New Currency. Imagine the situation, that you need to add Jamaica’s Dollar. 1. Unroll Configuration. 2. Click on Register. 3. Search by Main...
Change VAT
Change VAT We know for partners it is very difficult to fullfill wishes and needs of Clients. One of the needs is to setup a special VAT. Follow these steps to change the VAT successfully: 1. Unroll the Configuration in the left navigation menu. 2. Click on the...
Sub-tasks activation
Sub-tasks ActivationSome Teamogy functionality needs activation. The sub-tasks, that are part of Tasks, belong to this group. So see this simple tutorial on how to activate Sub-tasks. 1. In the left navigation menu, unroll Configuration. 2. Click on Register.3. Into...
Limit and Competence
Limit and CompetenceSometimes it happens that you have a user in two agencies that have different accounting currencies. Set different limits (competence) for processing documents in both agencies. First thing you need to do is find the process, where you want to...
Division and Department activation
Division and Department Activation Some Teamogy functionality needs activation. The Division and Department, belong to this group. So see this simple tutorial on how to activate Division and Department. This guide will show you, how to activate Division, but for the...
Creating of Division and Department
Creation of Division and Department In the first step - Division and Department activation - we showed up how to activate the Divisions. Now the use of Divisions in Teamogy is activated, but now we need to create the specific Divisions that clients will use. 1. In the...
Get in Touch
If you still have any questions or need further assistance, feel free to contact Teamogy support. You can use Online chat (inside the Teamogy or anywhere on www.teamogy.com in bottom right corner) and you will receive a prompt reply.